46
Bu özellik size üyenin attığı tüm iletileri gösterme olanağı sağlayacaktır . Not sadece size izin verilen bölümlerdeki iletilerini görebilirsiniz
48
Üye Atölyesi / Telefon tutucu
« : 28 Mart 2013, 09:26:25 »
Octi III için yapılmış ama Fabia, Octi, Superb, Yeti, Rapid, Citigo uyumlu
Parça no: 5JA8579539B9

Parça no: 5JA8579539B9

49
Fabia II / Ön difüzöre gel
« : 27 Mart 2013, 16:48:50 »
Marşpiyedeki eklenti de ilginç bir detay

http://www.eurotuningshop.de/produkt/fabia-ii/frontdiffusor-skoda-fabia-ii-fr-rs.html
http://www.eurotuningshop.de/sklep/fabia-ii.html

http://www.eurotuningshop.de/produkt/fabia-ii/frontdiffusor-skoda-fabia-ii-fr-rs.html
http://www.eurotuningshop.de/sklep/fabia-ii.html
50
Octavia A4 / Recaro Octavia
« : 22 Mart 2013, 10:05:45 »
Kesmişler garibanı çocuk oto koltuğu demoları için (e-bebek Çamlıca) 


51
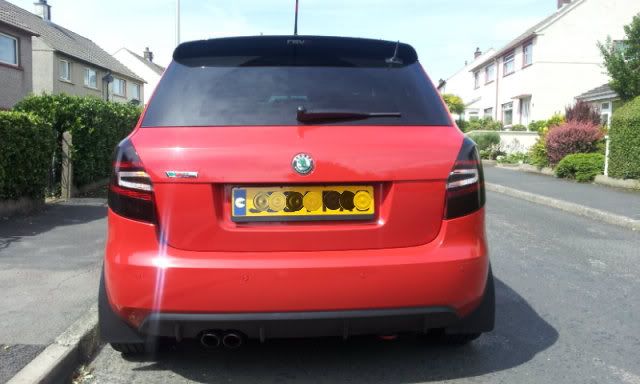
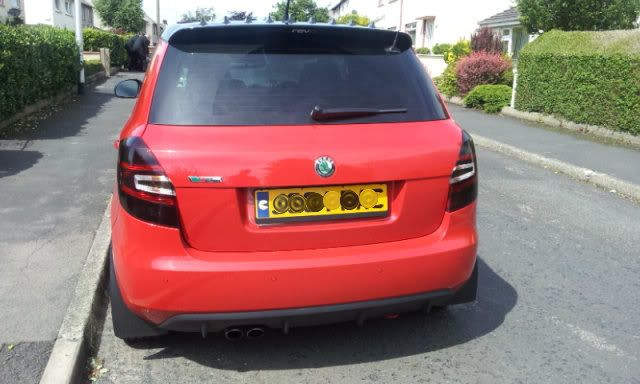
Üye Atölyesi / Desenli stop karartma
« : 13 Mart 2013, 13:24:43 »
Boyanmış hali beni feci dürtüklüyor 
Kaynak Briskoda
[quote name='jonny boy' timestamp='1343226752' post='2875179']
Thanks to Freddie (Confide) for sharing the secrets and pattern for this job. Been looking forward to changing them as I've hated the colour from new.
First remove the lights and clean them thoroughly with Isopropanol (or equivalent)
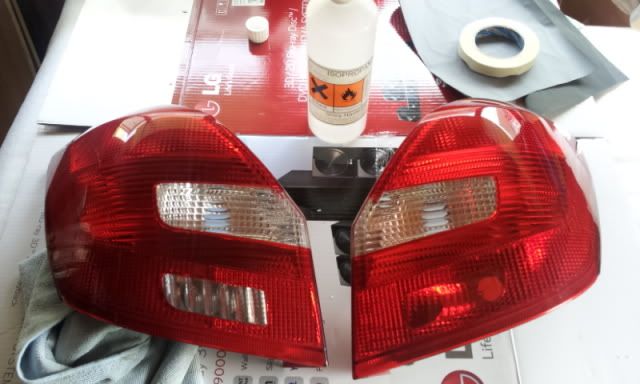
Then flat them down with 2000 grade wet & dry paper and they should look cloudy like this.
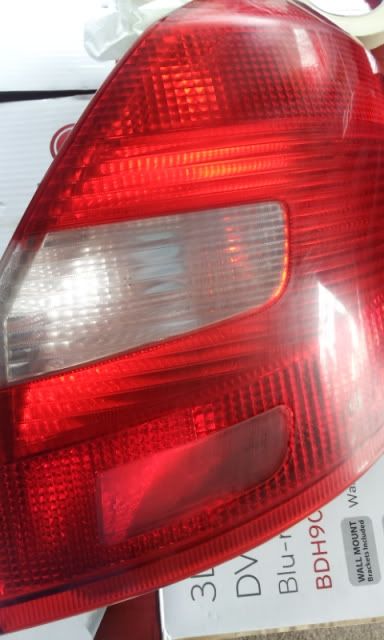
Then using quality masking tape such as 3M (do not use cheap stuff) tape the area you want to be seen.
I have done a indicator & brake light test already, so the following instructions do not obliterate the colour at all. All lights are easily visible day and night. I'll get some night shots done soon.
I used a precision craft knife for the 'corners' or any trimming. Just take your time and don't press hard.
Remember, the edges MUST be completely flat with no wrinkles etc. The finished edge will depend on this, so take note !
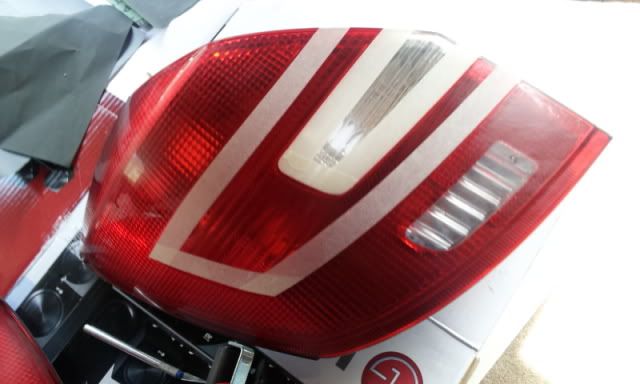
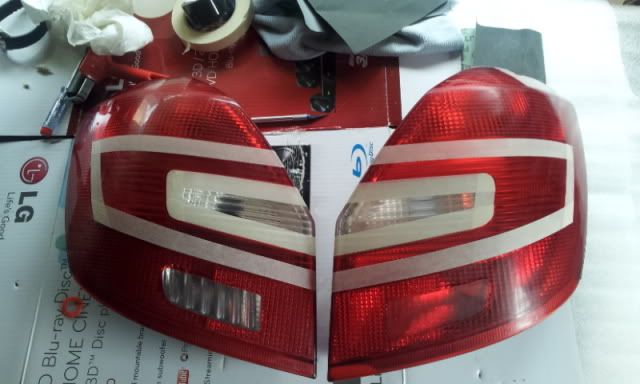
Next apply the tint spray in smooth left to right strokes. Don't be tempted to rush this, just one coat at a time (I used 6 in total for this effect) and leave 10 minutes between coats. This is important, don't rush application or it'll run.
Finally, peel the masking tape away carefully and slowly. If you had patience and smoothed the edges along with the decent masking tape, you'll have a nice neat edge.
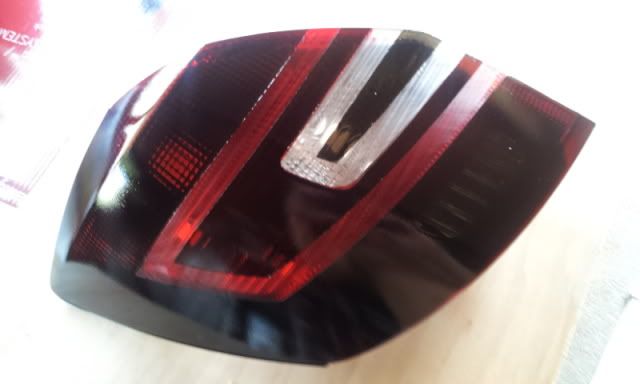
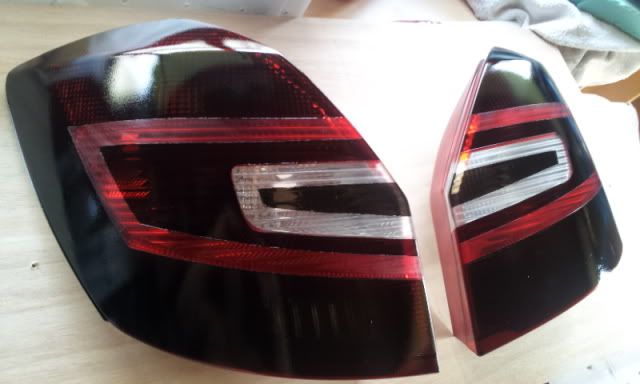
When these coats are dry, time to laquer the entire lens. I used 3 coats, again, wait for each one to dry !
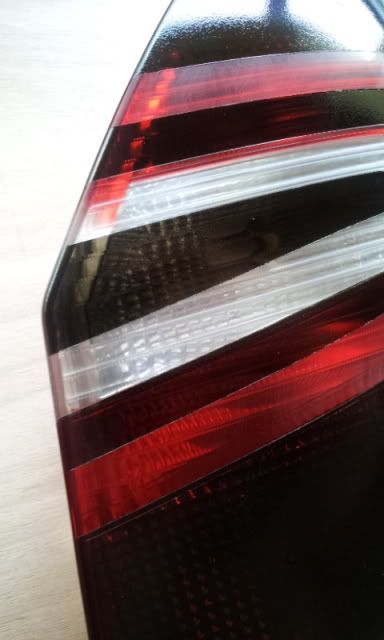
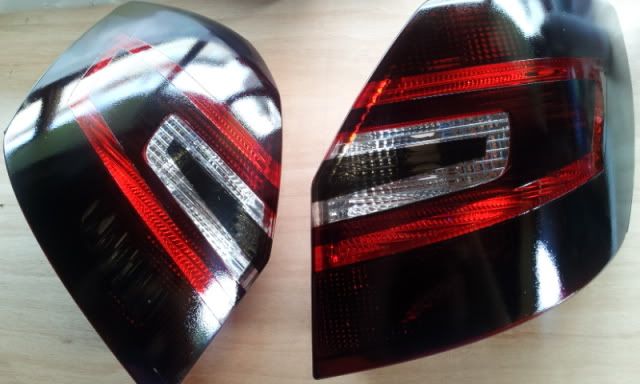
Here's the fitted lenses. They are finished with 2500 grade wet & dry paper, then polished with decent polish. Sorted
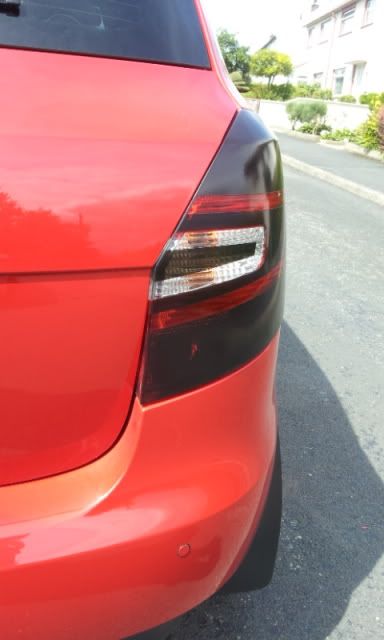
[/quote]

Kaynak Briskoda
[quote name='jonny boy' timestamp='1343226752' post='2875179']
Thanks to Freddie (Confide) for sharing the secrets and pattern for this job. Been looking forward to changing them as I've hated the colour from new.
First remove the lights and clean them thoroughly with Isopropanol (or equivalent)

Then flat them down with 2000 grade wet & dry paper and they should look cloudy like this.

Then using quality masking tape such as 3M (do not use cheap stuff) tape the area you want to be seen.
I have done a indicator & brake light test already, so the following instructions do not obliterate the colour at all. All lights are easily visible day and night. I'll get some night shots done soon.
I used a precision craft knife for the 'corners' or any trimming. Just take your time and don't press hard.
Remember, the edges MUST be completely flat with no wrinkles etc. The finished edge will depend on this, so take note !


Next apply the tint spray in smooth left to right strokes. Don't be tempted to rush this, just one coat at a time (I used 6 in total for this effect) and leave 10 minutes between coats. This is important, don't rush application or it'll run.
Finally, peel the masking tape away carefully and slowly. If you had patience and smoothed the edges along with the decent masking tape, you'll have a nice neat edge.


When these coats are dry, time to laquer the entire lens. I used 3 coats, again, wait for each one to dry !


Here's the fitted lenses. They are finished with 2500 grade wet & dry paper, then polished with decent polish. Sorted


[/quote]
52
Fabia II / Fabia II dış dikiz aynasında yeri aydınlatan LED - Courtesy light
« : 13 Mart 2013, 13:09:16 »
Temiz işçilik 
Yeri de hazırmış
[quote name='32KOFDATA' timestamp='1360068179' post='3124529']
After a long wait I finally managed to complete my puddle lights mod. I tried to document the procedure as best as I could in the hope that it will help others to complete the mod or something similar. Hold on to your seats cause it is a looong post but at least its got plenty of pics
1. Choosing the right led. It had to be powerful/bright, small enough, waterproof and with a low profile otherwise it would look ugly sticking out from the bottom of the wing mirror. All LEDs pictured below are great and very bright but the one that was perfect for the job was the "Oznium High Intensity Flush Mount LED Bolt (without lens)"

Not only it is super bright, with an aluminum fully waterproof casing it also has a ring that allows you to screw the led on any flat surface. The light temperature is a bluish white and in case someone fancies something more colorful there are loads of other colors too for purchase. More here: http://www.oznium.com/led-bolt (by the way Oznium has got a great speedy service and loads more interesting products, so have a look around).
Note! at the time of purchase the only "Oznium Led Bolt" choice was the 16mm version. Soon after Oznium came up with an 11mm version which to be honest might be easier to install. Also if you are interested the color I picked was Cool White.


2. Choosing the right place to install the puddle light. At first I was considering opening the wing mirror and drilling a hole into the casing but quickly realized that if things went sour the expense of replacing the glass and casing would be high. Especially after I saw how the glass needs to be removed and how fragile it is. Anyways, after further inspection I discovered that the Fabia wing mirror arm has a cap for some reason (?). It was very easy to remove and in the case things didn't work out with my installation it is probably very cheap to replace (well cheaper than a mirror and wing mirror casing).
Note! if you are proficient and know how to dismantle a wing mirror without issues then go for it! I believe that the LEDs will light up much better the ground if sitting right below the wing mirror and further away from the car body.


What you are seeing coming through are the three wires for manual adjustment of the mirror. Note! my wing mirrors are non electric! Those with electric/heated mirrors they will find a wire harness running through rather 3 steel wires. See picture below (thank you Confide for the pic )
)


After you remove the caps use the LED ring as a guide and draw a circle as dead center as possible. Then drill a hole big enough for the LED to go through.

I used a Dremmel as you can see and slowly made the opening wider. After a few tries you will get the sizing right and no worries if the shape is not perfect. The LED will hide the mistakes. The plastic is soft and will not give you a hard time.


3. On now to removing the door cards and gain access to the wing mirror. First remove the handle cover by pulling from the side that faces the window switch. Then pull and lift so the rest comes off. Don't be afraid and use force as the metal clips holding it are very strong.

Then unscrew 2 torx screws and

two screws at the bottom

Un-clip the door card starting from the bottom and moving up. Lift it up so it comes off the window slot on the top. Note! that there are still cables attached to the back so don't pull or remove the door card yet.

This is really a job for two people. There are three cables to be unplugged that are still attached to the door card. In the case of the passenger side there are two. First remove the plug of the lock light.

Then it's the turn of the handle cable. First un-clip the hinge and then the metal rod that it is attached to the handle itself.

and finally remove the plug of the window switches. These might differ slightly depending your setup. 2 or 4 electric windows but the procedure is the same really.

Now the door card is free!

4. Next up is removing the wing mirror and installing the LEDs. First remove the triangular cover by simply pulling it out.

Below you will find 3 torx screws - unscrew them and that will free the wing mirror. Note! that as I've said before I got non electric mirrors so that is why you are seeing three steel wires running through. In the case of electric mirror owners there will be a wire harness.

After detaching the wing mirror it is time to run through the LED cable.

Note! that in my case the three steel wires were obstructing the led casing from going all the way up. I had to grind the top edges and bring the casing profile a bit lower. In the case of people with electric mirrors not sure how much lower you got to bring the profile down OR if needed at all. Unfortunately at this stage it is unknown to me. Just take extra care and don't cut the wires or damage them. If you feel not comfortable with this then you could use the "Oznium Hyperflux LEDs" which will fit easier due to their much smaller size. (see on top pic).

After a few tries and fitment will be perfect! Don't worry about the steel wires - they will work just fine.

5. To make this a stealthy as possible installation you will have to run the LED cable through the inside of the door and then again through to the bottom of the dash. First remove the speaker by unscrewing the four screws that hold it.

then run the LED cable through the rubber plug (you might need to make a small cut to gain access). Note! Make sure you run the cable along with the wiring harness of the door cables. That way it will not obstruct the window mechanism.

Run the cable through to the dash. This part was a pain. It involves again one small cut to the rubber plug and fishing the cable so it comes through the other side. The curse-meter went off the chart. It is not hard it is just time consuming so better get prepared (tea, coffee anyone?).

[/quote]
[quote name='32KOFDATA' timestamp='1360068200' post='3124530']
6. At this point the led cable will run out, just right below the dash which is fine and you will simply need to extend it with more 12v cable so you can run it through all the way up to the interior light.


7. Removing the pillars is just a matter of pulling them out with your fingers. It needs a bit of force as they are held by three metallic plugs. Start from the top and make your way down.


At this point it would be a good idea to remove the front dome light. Remove the clear plastic cover with your fingers and then undo the two screws that hold the body to the roof.

Simply push it down with your fingers.

Now time to run the extension cable! The easiest way is where the dash meets the door seal. Just pull the cable up and in.

Help with your fingers any bits that are still giving a fight.

When the cable comes out the other side run it along the airbag wiring harness so the whole setup is nice and tidy and at the top just push it through the roof cover.

use your fingers to push the rest through the front of the roof cover and then try to push the end through the dome light opening.

9. Here you will need to connect it to the correct cables so the puddle lights will function in the same way the dome light does. Below is a very crude way to show you where to tap into - Not happy with how I've portrayed this part so I will probably will have to get you more pic of the process and of course based on you electricians skills you can make it look very sleek.

...and guess what? you are done!
the same process is required for the other side so you know what to do.
And I hear you ask... can the installation be seen during the day? well below is proof that even from up close and on the same level as the wing mirror it is difficult to detect.

...and now for some pics of the final result at night.


and a video too...
[media]http://youtu.be/WYOL9Uo3R2Q[/media]
[/quote]
http://www.briskoda.net/forums/topic/264668-wing-mirror-lights-for-fabia-mkii-puddle-lights/

Yeri de hazırmış
[quote name='32KOFDATA' timestamp='1360068179' post='3124529']
After a long wait I finally managed to complete my puddle lights mod. I tried to document the procedure as best as I could in the hope that it will help others to complete the mod or something similar. Hold on to your seats cause it is a looong post but at least its got plenty of pics
1. Choosing the right led. It had to be powerful/bright, small enough, waterproof and with a low profile otherwise it would look ugly sticking out from the bottom of the wing mirror. All LEDs pictured below are great and very bright but the one that was perfect for the job was the "Oznium High Intensity Flush Mount LED Bolt (without lens)"

Not only it is super bright, with an aluminum fully waterproof casing it also has a ring that allows you to screw the led on any flat surface. The light temperature is a bluish white and in case someone fancies something more colorful there are loads of other colors too for purchase. More here: http://www.oznium.com/led-bolt (by the way Oznium has got a great speedy service and loads more interesting products, so have a look around).
Note! at the time of purchase the only "Oznium Led Bolt" choice was the 16mm version. Soon after Oznium came up with an 11mm version which to be honest might be easier to install. Also if you are interested the color I picked was Cool White.


2. Choosing the right place to install the puddle light. At first I was considering opening the wing mirror and drilling a hole into the casing but quickly realized that if things went sour the expense of replacing the glass and casing would be high. Especially after I saw how the glass needs to be removed and how fragile it is. Anyways, after further inspection I discovered that the Fabia wing mirror arm has a cap for some reason (?). It was very easy to remove and in the case things didn't work out with my installation it is probably very cheap to replace (well cheaper than a mirror and wing mirror casing).
Note! if you are proficient and know how to dismantle a wing mirror without issues then go for it! I believe that the LEDs will light up much better the ground if sitting right below the wing mirror and further away from the car body.


What you are seeing coming through are the three wires for manual adjustment of the mirror. Note! my wing mirrors are non electric! Those with electric/heated mirrors they will find a wire harness running through rather 3 steel wires. See picture below (thank you Confide for the pic


After you remove the caps use the LED ring as a guide and draw a circle as dead center as possible. Then drill a hole big enough for the LED to go through.

I used a Dremmel as you can see and slowly made the opening wider. After a few tries you will get the sizing right and no worries if the shape is not perfect. The LED will hide the mistakes. The plastic is soft and will not give you a hard time.


3. On now to removing the door cards and gain access to the wing mirror. First remove the handle cover by pulling from the side that faces the window switch. Then pull and lift so the rest comes off. Don't be afraid and use force as the metal clips holding it are very strong.

Then unscrew 2 torx screws and

two screws at the bottom

Un-clip the door card starting from the bottom and moving up. Lift it up so it comes off the window slot on the top. Note! that there are still cables attached to the back so don't pull or remove the door card yet.

This is really a job for two people. There are three cables to be unplugged that are still attached to the door card. In the case of the passenger side there are two. First remove the plug of the lock light.

Then it's the turn of the handle cable. First un-clip the hinge and then the metal rod that it is attached to the handle itself.

and finally remove the plug of the window switches. These might differ slightly depending your setup. 2 or 4 electric windows but the procedure is the same really.

Now the door card is free!

4. Next up is removing the wing mirror and installing the LEDs. First remove the triangular cover by simply pulling it out.

Below you will find 3 torx screws - unscrew them and that will free the wing mirror. Note! that as I've said before I got non electric mirrors so that is why you are seeing three steel wires running through. In the case of electric mirror owners there will be a wire harness.

After detaching the wing mirror it is time to run through the LED cable.

Note! that in my case the three steel wires were obstructing the led casing from going all the way up. I had to grind the top edges and bring the casing profile a bit lower. In the case of people with electric mirrors not sure how much lower you got to bring the profile down OR if needed at all. Unfortunately at this stage it is unknown to me. Just take extra care and don't cut the wires or damage them. If you feel not comfortable with this then you could use the "Oznium Hyperflux LEDs" which will fit easier due to their much smaller size. (see on top pic).

After a few tries and fitment will be perfect! Don't worry about the steel wires - they will work just fine.

5. To make this a stealthy as possible installation you will have to run the LED cable through the inside of the door and then again through to the bottom of the dash. First remove the speaker by unscrewing the four screws that hold it.

then run the LED cable through the rubber plug (you might need to make a small cut to gain access). Note! Make sure you run the cable along with the wiring harness of the door cables. That way it will not obstruct the window mechanism.

Run the cable through to the dash. This part was a pain. It involves again one small cut to the rubber plug and fishing the cable so it comes through the other side. The curse-meter went off the chart.

[/quote]
[quote name='32KOFDATA' timestamp='1360068200' post='3124530']
6. At this point the led cable will run out, just right below the dash which is fine and you will simply need to extend it with more 12v cable so you can run it through all the way up to the interior light.


7. Removing the pillars is just a matter of pulling them out with your fingers. It needs a bit of force as they are held by three metallic plugs. Start from the top and make your way down.


At this point it would be a good idea to remove the front dome light. Remove the clear plastic cover with your fingers and then undo the two screws that hold the body to the roof.

Simply push it down with your fingers.

Now time to run the extension cable! The easiest way is where the dash meets the door seal. Just pull the cable up and in.

Help with your fingers any bits that are still giving a fight.

When the cable comes out the other side run it along the airbag wiring harness so the whole setup is nice and tidy and at the top just push it through the roof cover.

use your fingers to push the rest through the front of the roof cover and then try to push the end through the dome light opening.

9. Here you will need to connect it to the correct cables so the puddle lights will function in the same way the dome light does. Below is a very crude way to show you where to tap into - Not happy with how I've portrayed this part so I will probably will have to get you more pic of the process and of course based on you electricians skills you can make it look very sleek.

...and guess what? you are done!
the same process is required for the other side so you know what to do.
And I hear you ask... can the installation be seen during the day? well below is proof that even from up close and on the same level as the wing mirror it is difficult to detect.

...and now for some pics of the final result at night.


and a video too...
[media]http://youtu.be/WYOL9Uo3R2Q[/media]
[/quote]
http://www.briskoda.net/forums/topic/264668-wing-mirror-lights-for-fabia-mkii-puddle-lights/
56
Paylaşım / Monika'nın Oktavyası
« : 01 Şubat 2013, 11:25:17 »
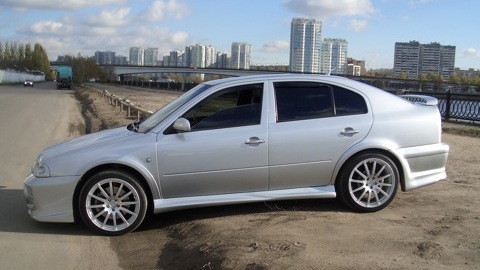
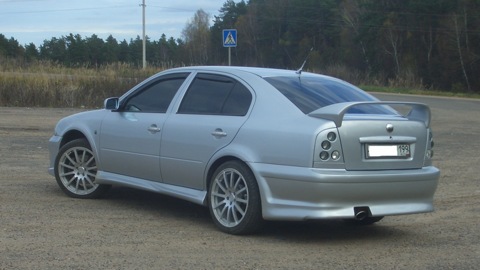
Ruslar değişik yahu, ne kadar çok bayan var Skodasıyla foto çektiren
Abla pek bir kraliyet soyundan

Abla pek bir kraliyet soyundan


59
Üye Atölyesi / Kapı döşemesi klipsleri
« : 22 Ocak 2013, 13:43:45 »
Lazım olursa kodu 6Y0 867 260


60
Fabia II / Monte Carlo siyah dış trimlerin ve farların parça kodları
« : 22 Ocak 2013, 10:20:41 »
Davlumbazın üstünde olanlar
Sol ön - 5J0 853 507 A F9R (117.93)
Sağ ön - 5J0 853 508 A F9R (121.50)
Sol arka - 5J0 853 057 A F9R (58.31)
Sağ arka - 5J0 853 058 A F9R (58.31)
Kapı altında olanlar
Sol - 5J9 853 905 A F9R (244.55)
Sağ - 5J9 853 906 A F9R (244.55)
Parantez içinde olanlar Euro kurundan fiyatları
Bu da aydınlatma grubu kodları
5J1941017F - Sol far
5J1941018F - Sağ far
5J0941701C - Sol sis
5J0941702C - Sağ sis
Davlumbaz/çamurluk üstündeki siyah plastikler nedense lastikle kaporta arasındaki boşluğu daha büyük gösterdiği için hoş gelmiyor gözüme şahsen

Sol ön - 5J0 853 507 A F9R (117.93)
Sağ ön - 5J0 853 508 A F9R (121.50)
Sol arka - 5J0 853 057 A F9R (58.31)
Sağ arka - 5J0 853 058 A F9R (58.31)
Kapı altında olanlar
Sol - 5J9 853 905 A F9R (244.55)
Sağ - 5J9 853 906 A F9R (244.55)
Parantez içinde olanlar Euro kurundan fiyatları

Bu da aydınlatma grubu kodları
5J1941017F - Sol far
5J1941018F - Sağ far
5J0941701C - Sol sis
5J0941702C - Sağ sis
Davlumbaz/çamurluk üstündeki siyah plastikler nedense lastikle kaporta arasındaki boşluğu daha büyük gösterdiği için hoş gelmiyor gözüme şahsen

