škodaturkey.com
Biz bir aileyiz...

İletileri Göster

Bu özellik size üyenin attığı tüm iletileri gösterme olanağı sağlayacaktır . Not sadece size izin verilen bölümlerdeki iletilerini görebilirsiniz


Konular - lrfan

Sayfa: 1 ... 5 6 7 8 9 ... 46
91
Üye Atölyesi / Fabia II-Roomster dikizi aynası sökümü
« : 10 Ağustos 2012, 21:57:47 »
Özellikle dikiz aynalarını boyatmak için sökecek olan varsa...
 
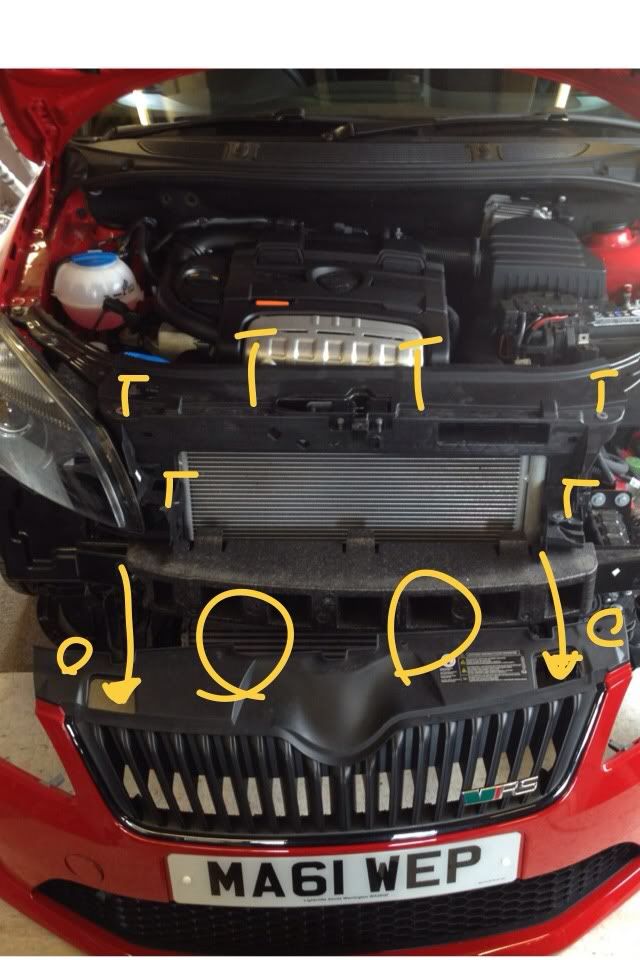
Bütün iş 4 nolu çerçeveyi nazikçe sökmekte, çokça tırnak var, plastik levyelerle tatlı tatlı aşağıdan kanırtmaya başlayın, soğuk havada risklidir plastik kırılgan oluyor. Sonrasında 1 nolu kapak yukarı çekince çıkıyor  ;)
 

92
Fabia II / 1.2 TSI downpipe
« : 06 Ağustos 2012, 14:58:55 »
Dolanırken gördüm paylaşayım dedim :)
 
Ne kadar artış yapmış bilgisi yoktu gerçi


Stock exhaust system of Polo 1.2.....


VW Polo 1.2 TSI engine.....


Stock VW Polo 1.2 downpipe on the IHI turbo....


Cat deleted downpipe by SuperCircuit.
SuperCircuit tarafından downpipe silindi.
Made of grade 304 stainless steel, mandrel bent and TIG/Argon welded.


After the downpipe is the cat back exhaust kit, which is also made from similar high grade CNC mandrel bent stainless steel piping, TIG/Argon welded to perfection....


SuperCircuit downpipe with VW Polo 1.2 at the background....


93
Paylaşım / Kampana yerine diski boyayan var mıdır?
« : 30 Temmuz 2012, 18:35:18 »

94
Üye Atölyesi / Fabia II ilginç desenli STOP karartma
« : 26 Temmuz 2012, 07:44:02 »
Meraklısına (bence 3 kat koyu olmuş, daha hafif olabilirdi)
 
Linkte bol foto ve uygulaması
 
http://www.briskoda.net/forums/topic/244976-vrs-rear-light-tinting/
 

96
Fabia II / ^^vRS^^
« : 16 Temmuz 2012, 09:35:40 »


97
Paylaşım / Detaycının SKoda Pastası
« : 15 Temmuz 2012, 13:29:50 »
Tam benlikmiş  :)


98
Üye Atölyesi / Kaput kaput
« : 03 Temmuz 2012, 15:46:42 »

 
300 Euro'ya özel yapım kaput

99
Fabia II / Fabia II diz mesafesi
« : 02 Temmuz 2012, 09:03:09 »
Aracı eşim kullanırken bana kalan diz mesafesi  :)
 
Kızımla arkada tepinecek kadar bol yer var :rock1:
 

101
Üye Atölyesi / Tampon sökümü - Fabia II / Roomster
« : 29 Haziran 2012, 09:53:42 »
Briskoda sitesinden alıntı, güzel detay :ok:
 
 
Alıntı
Ok so as I was taking the front bumper off today to remove a headlight and fix a broken bracket, I got a few shots and have compiled a "how to" guide.

1. I found a thread with the following instructions so I referred to this as I went along. Ok, so bonnet up and undo the 2 x torx screws on the top of the grille just either side of the bonnet catch also there is some small split pins, below is a picture showing the aprox locations of the pins and the screws. The pins are easy to remove just pull the centre pin out and pop the clip out of the trim.

(Picture is just for location reference, the bumper does not just come off with those pins and screws.)


2 . Whilst you are there there is 2 x torx screws in the gap either side of the first two holding in place a corner of each headlight (I used a extendable magnet to carefully raise these up and out.)

3. I jacked up the side of the car I was working on and undid all the torx screws holding on the wheel arch inner plastic. See below


I referred to the diagram below for the locations of all these torx but they are mainly found around the inner edge. See picture for reference


There are some at the back by the suspension that are quite awkward to reach but if you jacked up it shouldn't be a problem.

4. I got under the car and undid all the torx screws that connect the wheel arch lining to the front bumper, also the engine plastic skid tray.


As you can see the plastic from your wheel arch lining just slides onto your front bumper and is secured in place with a torx screw. There are some pins that look like they should be removed but I didn't bother with them, I only undid all the torx. Shown below are the pins and some of the torx required to be removed ( as I said I just undid all the torx, left the pins and removed the skid tray)


Showing how arch lining attached to bumper


Can be quite awkward but just slides on


5. I then removed the drls, these are held in with 3 x torx screws for each light.


They disconnect easily once they are removed from the bumper fixings with a clip connection for the power supply.

6. There are two sections in your honeycomb plastic lower grill that pop out to reveal two more torx screws.


7. I went back under the car to remove all the torx screws from the front edge of the bumper using the picture below as a guide.


Here are the front torx


8. Referring to the picture I made sure I had removed all the screws needed but left four till last. These four are the ones that hold the bumper to your front quarter panels. This is why the car was jacked up high and had the wheel arch lining dropped down on to the trye. This gives you enough room to get a ratchet spanner in with a torx head adapter in to undo these four screws (2 x either side).

Here's a shot showing the lining dropped out and the bumper removed, showing the gap I put my hand in to get to the two troublesome bolts


Annotated to show appeox position of screws and where I found access to them.


Bumper attachment shot.


This all mates up when attached and screwed together.

9. Carefully then with the help from my friend we got hold of the bumper in the honeycomb grille and gently slid and pulled the bumper off it's holding brackets. Then lowered it down onto a soft surface to prevent any scratching to paintwork.


When I got stuck I just referred to picture guide that I included above, and when pricing it back to get her I just did all the above in a reverse manner.

Hope this helps Anyone looking to do this.

**This is purely for guidance only, attempt it at your own risk**

Mike

102
Üye Atölyesi / Fabia kaput pistonu! Şahkan Otomotiv
« : 29 Haziran 2012, 09:04:33 »
Şahkan Oto'ya teşekkürlerimle başlayayım, olmayan şeyi oldurdukları için, ilgileri için :ok:
 
Önce adaptörsüz olarak denedik boş delikleri deneyerek, çok kasılıyordu. Ona ait fotolar...


Baktık kasıyor bu açıda bir sistem, Usta köşebentten bir adaptör yaptı, hem de diğer tarafa, yani orijinal çengeli bozmadık, sökmedik, güzel oldu. 5-6 tane farklı boy ve güçte çıkma piston denedi Serkan ustam.
 
Aynı boyda olanların da itme gücü farklı idi, zayıf olan yetmedi dik tutumaya, güçlü olan bir tane takıldı, 47 cm boyda ;)
 
İlk adaptörün sacı biraz ince geldi, esniyordu pistonu takınca


Üşenmedi, sağlam köşebentten keserek, biraz eğerek yaptı 2. bir tane, hemen mat siyah boya ile boyadım, elimde o vardı, anti-pas niyetine :)
 
Tertemiz işçilik maşallah :ok:


özet olarak, her araca yapılabilecek bir iş, sadece farklı araçlar için ölçü alınmalı, usta hemen yapıveriyor parçayı, fiyat belirsiz, işe göre değişebilir. Benim araca çıkma pistonla yaptık, yeni olması şart değil.
 
Yaptıracak arkadaşlar gitmeden önce mutlaka sorsun, parça-piston var mı diye ;)

103
Fabia II / Fabia II / Roomster için cep telefonu yeri
« : 25 Haziran 2012, 09:16:43 »
Güzel fikirmiş, en azından tangır tungur etmez, yine benden yeni bir gündem :) Citigo için üretilmiş ama fotodaki bizim gözlere de oluyormuş
 
Parça kodu: 1ST857953A Yetkili servisten sipariş edilebilir, muhtemelen Çeklerden gelecek, burada yoktur henüz.


104
Fabia II / Fabia III
« : 22 Haziran 2012, 11:15:24 »
Sanırım buna benzeyecek artık  :)


105
Paylaşım / Şöyle bir tablet PC'ye ne dersiniz?
« : 15 Haziran 2012, 13:49:25 »
10 Inch Android 4.0 Flytouch 6 Tablet PC Cortex A8 1G DDR3 GPS Skype+Car Charger
 
http://www.ebay.com/itm/10-Inch-Android-4-0-Flytouch-6-Tablet-PC-Cortex-A8-1G-DDR3-GPS-Skype-Car-Charger-/200765644645?pt=US_Tablets&hash=item2ebe909f65#shId


Eşim yolda pdf kitap okumak, word'de yazı yazmak vs. için arıyor, keza wi fi ile maillerine bakmak vs.
 
142 $ posta dahil fiyatı var, ne dersiniz?

Sayfa: 1 ... 5 6 7 8 9 ... 46